Flutter 상태관리 with freezed

소개
Flutter에서 State를 생성할 때, 방법으로 Bloc에서 추천하는 Equatable을 사용해왔다. 하지만 개발 편의성과 copy, toString override, json 변환 등 여러 기본 기능을 활용하여 개발 속도를 단축하고자 Freezed를 도입하게 되었다. 이번 내용은 Flutter freezed의 기본 활용법을 정리한 내용이다.
Freezed란?
Dart는 잘 만들어진 언어로 활용하기 좋지만, Model을 정의할 때는 조금 귀찮아질 수 있다. 간단하게만 생각해보아도 모델을 생성하기 위해서는 아래의 과정을 수행해야 한다.
- 생성자(constructor) 와 속성(properties) 정의
toString,operator ==,hashCode재작성(override)copyWith함수를 통해 객체를 복제하는 방법 구현- 직렬화(serialization), 역직렬화(deserialization) 처리
이를 매번 생성하기 위해서는 불필요한 반복 작업이 발생하며, 이는 실수로 인한 오류를 낳고 코드를 한눈에 알아보기도 힘들다. 따라서 Freezed는 최소한의 코드만 작성하여 이에 대한 상세 구현은 분리해두어 선언형 프로그래밍을 통해 사용자가 모델 정의에만 집중할 수 있도록 해준다.
| Before | After |
|---|---|
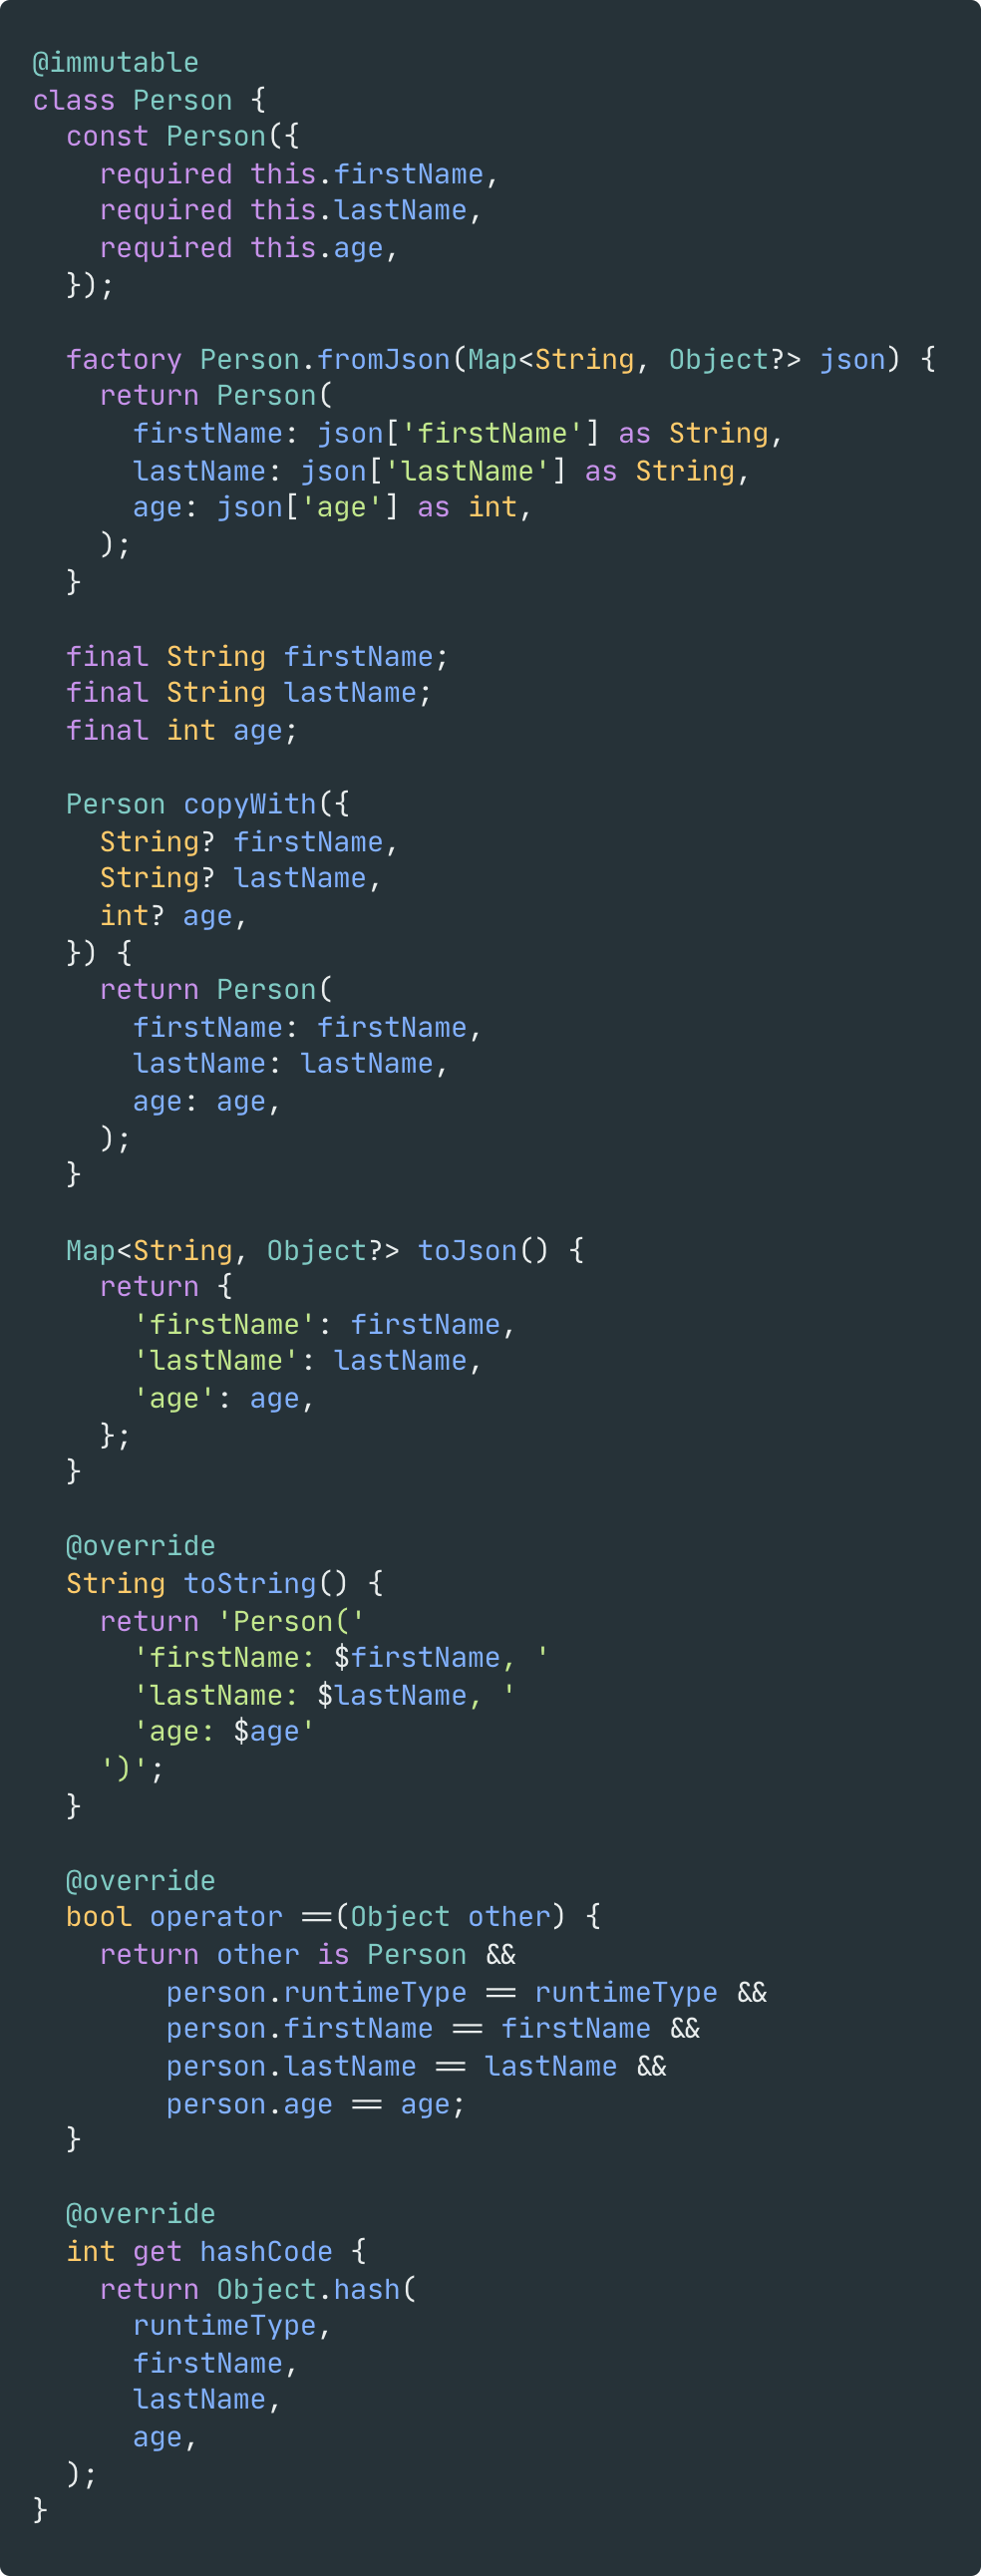 |  |
사용 방법
설치
Freezed를 사용하려면 build_runner/code-generator 설정이 필요하다. 먼저 pubspec.yaml 파일에 아래와 같이 dependency를 추가해준다.
dependencies:
  freezed_annotation: (*required)
  json_annotation: (optional)

dev_dependencies:
  build_runner: (*required)
  freezed: (*required)
  json_serializable: (optional)
json_annotaion과json_serializable의 경우fromJson/toJson을 사용한다면 추가해주어야 한다.
- build_runner: Code generator를 실행하기 위한 툴
- freezed: Code generator
- freezed_annotaion:
freezed에 대한 annotation을 포함하는 패키지
Freezed와 함께 json_serializable을 사용할 때, json_serializable과 meta의 최신버전을 사용한다면 invalid_annotaion_target 경고를 비활성해줘야할 수도 있다.
아래와 같이 analysis_options.yaml 파일에 추가하여 비활성화 한다.
analyzer:
  errors:
    invalid_annotaion_target: ignore
모델 코드 작성
아래의 예시를 보자.
// 파일명은 "example.dart"로 설정하였다.
import 'package:freezed_annotation/freezed_annotation.dart';
import 'package:flutter/foundation.dart';
// required: Freezed code generator를 통해 생성된 코드와 연결해준다.
part 'main.freezed.dart';
// optional: 모델 클래스를 직렬화 해줘야한다면 아래의 파일을 추가해주어야 한다. 불필요하다면 넘어가도 된다.
part 'example.g.dart';
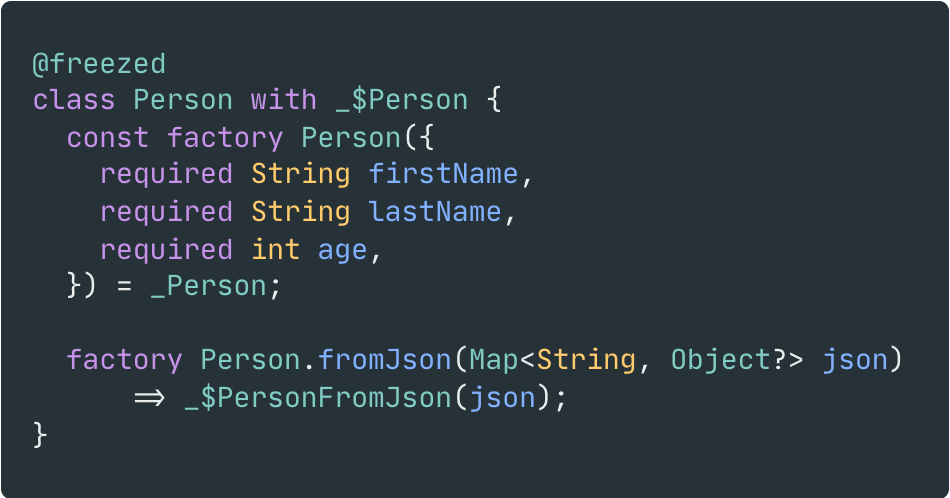
class Person with _$Person {
const factory Person({
required String firstName,
required String lastName,
required int age,
}) = _Person;
factory Person.fromJson(Map<String, Object?> json)
=> _$PersonFromJson(json);
}
위 Snippet은 Person이라는 이름의 모델을 정의한다.
Person은 3개의 속성을 가지고 있다. (firstName,lastName,age)@freezed를 사용하므로 이 클래스의 모든 속성은 변경할 수 없다(immutable).fromJson을 정의하였으므로, 직렬화/역직렬화가 가능하다. Freezed는toJson함수도 제공해줄 것이다.- Freezed는 다음 사항들도 자동으로 생성해준다.
copyWithmethod: 객체를 다른 속성으로 복제하기 위함toStringoverride: 객체의 모든 속성을 문자열로 나열operator ==andhashCodeoverride (Person이 immutable 하므로)
위 예에서 우리는 아래와 같은 몇가지 사실을 알 수 있다.
- 모델에
@freezed(또는@Freezed/@unfreezed) 주석을 달아야한다. - 클래스의 이름 앞에
_$를 붙인Mixin을 적용해야한다. 이 믹스인은 객체의 다양한 속성/메서드를 정의한다. - Freezed 클래스에�서 생성자를 정의할 때는
factory키워드를 표시된대로 사용해야한다. 이 생성자의 매개변수는 이 클래스에 포함된 모든 속성의 목록이 된다. 매개변수는 반드시name을 설정해주거나required일 필요는 없다. 원하는 경우 선택적 매개변수를 자유롭게 사용하면 된다.
mutable 클래스 정의하기
위 기본 예시의 경우 모든 속성이 final인 모델을 정의하는 방법을 알아보았다. 하지만 상황에 따라 변경 가능한 속성을 정의하고 싶을때도 있을 것이다.
Freezed는 @freezed 주석을 @unfreezed로 대체하여 이를 지원한다.
class Person with _$Person {
factory Person({
required String firstName,
required String lastName,
required final int age,
}) = _Person;
factory Person.fromJson(Map<String, Object?> json)
=> _$PersonFromJson(json);
}
이는 이전 Snippet과 거의 동일한 모델을 정의하지만 아래와 같은 차이가 있다.
-
firstName,lastName은 이제 변경 가능하다. 따라서 다음과 같이 활용할 수 있다.void main() {
var person = Person(firstName: 'John', lastName: 'Smith', age: 42);
person.firstName = 'Mona';
person.lastName = 'Lisa';
} -
age의 경우 여전히 변경할 수 없는데, 이는final속성을 명시적을 표시했기 때문이다. -
Person클래스에는 커스텀==/hashCode구현이 없다.void main() {
var john = Person(firstName: 'John', lastName: 'Smith', age: 42);
var john2 = Person(firstName: 'John', lastName: 'Smith', age: 42);
print(john == john2); // false
} -
당연히,
Person클래스는 변경 가능하기 때문에const를 사용하여 인스턴스화 하는 것은 불가능하다.
Mutable Lists/Maps/Sets
기본적으로 @freezed 유형의 List, Map, Set 속성은 변경 불가능하도록 반환된다.
즉, 다음과 같이 작성하면 런타임 오류가 발생한다.
class Example with _$Example {
factory Example(List<int> list) = _Example;
}
void main() {
var example = Example([]);
example.list.add(42); // 콜랙션 변경을 시도하므로 오류 발생
}
아래와 같이 속성값을 추가하여 해당 동작을 비활성화할 수 있다.
(makeCollectionsUnmodifiable: false)
class Example with _$Example {
factory Example(List<int> list) = _Example;
}
void main() {
var example = Example([]);
example.list.add(42); // OK
}
copyWith 작동 방식
앞서 확인했듯이, Freezed를 사용하여 모델을 정의할 때 코드 생성기는 자동으로 copyWith 메서드를 생성해준다. 이 메서드는 다른 값을 가진 객체를 복제하는 데 사용된다.
class Person with _$Person {
factory Person(String name, int? age) = _Person;
}
위 예시와 같이 작성했을 경우 아래와 같이 사용할 수 있다.
void main() {
  var person = Person('Remi', 24);

  // `age` not passed, its value is preserved
  print(person.copyWith(name: 'Dash')); // Person(name: Dash, age: 24)
  // `age` is set to `null`
  print(person.copyWith(age: null)); // Person(name: Remi, age: null)
}
person.copyWith(age: null)와 같이 Freezed는null값을 입력값으로 사용할 수 있다.
Deep copy
copyWith로도 이미 충분히 쓸만하지만, 만약 더 복잡한 객체를 다룬다면 불충분할 수 있다.
아래의 클래스를 보자.
class Company with _$Company {
factory Company({String? name, required Director director}) = _Company;
}
class Director with _$Director {
factory Director({String? name, Assistant? assistant}) = _Director;
}
class Assistant with _$Assistant {
factory Assistant({String? name, int? age}) = _Assistant;
}
우리가 Company를 참조할 때, Assistant를 변경하고 싶을 때가 있을 것 이다. Assistant의 name을 copyWith로 변경하기 위해 우리는 아래와 같이 코드를 작성해야할 것이다.
Company company;

Company newCompany = company.copyWith(
  director: company.director.copyWith(
    assistant: company.director.assistant.copyWith(
      name: 'John Smith',
    ),
  ),
);
위와 같이 작성하여도 원하는대로 동작하지만, 중복되는 코드가 많아서 직관적이지 못하다.
이러한 경우에 Freezed의 "deep copy"를 사용할 수 있다.
Freezed 모델에 Freezed 모델인 �속성이 포함되어 있는 경우 코드 생성기는 아래와 같은 대체 구문을 제공한다.
Company company;

Company newCompany = company.copyWith.director.assistant(name: 'John Smith');
위 코드는 처음에 보았던 코드와 동일하게 동작(company내의 assistant name 수정)하지만 이제 중복되는 코드를 작성할 필요가 없다.
이 구문을 활용하면 만약, 감독의 이름을 변경하고 싶을 때에도 아래와 같이 사용할 수 있다.
Company company;
Company newCompany = company.copyWith.director(name: 'John Doe');
처음 정의한 Company / Director / Assistant 정의에 따라 아래와 같은 모든 "복사" 구문이 동작한다.
Company company;

company = company.copyWith(name: 'Google', director: Director(...));
company = company.copyWith.director(name: 'Larry', assistant: Assistant(...));
Null 타입 고려
일부 객체는 null이 될 수 있다. 예를 들어, Company 클래스를 사용할 때, Director의 assistant를 null로 설정할 수 있다.
아래 코드를 보자
Company company = Company(name: 'Google', director: Director(assistant: null));
Company newCompany = company.copyWith.director.assistant(name: 'John');
assistant가 없는데 assistant의 name을 수정하려 하므로 오류가 발생할 것을 쉽게 예측할 수 있다.
위 상황과 같이, company.copyWith.director.assistant는 null을 반환할 것이다. 따라서 우리의 코드는 컴파일에 실패한다.
이를 고치기 위해서 ?.call 연산자를 사용할 수 있다.
Company? newCompany = company.copyWith.director.assistant?.call(name: 'John');
모델에 Getter와 Method 추가하기
때로는 클래스에 수동으로 method/property를 추가해야할때가 있다.
하지만 다음 코드를 실행해보면 오류가 발생한다.
class Person with _$Person {
const factory Person(String name, {int? age}) = _Person;
void method() {
print('hello world');
}
}
컴파일 실패와 함께 다음과 같은 에러 내용이 표시될 것이다. The non-abstract class _$_Person is missing implementations for these members:
이를 수정하기 위해서는 빈 Private 생성자를 정의해야 한다. 그러면 생성된 코드가 클래스를 구현하는 대신 클래스를 확장/서브클래싱 할 수 있도록 한다.
class Person with _$Person {
// Added constructor. Must not have any parameter
const Person._();
const factory Person(String name, {int? age}) = _Person;
void method() {
print('hello world');
}
}
Asserts
Dart는 factory 생성자에 assert(...) 명령문을 추가하는 것을 허용하지 않는다. 따라서 Freezed 클래스에 assert를 추가하려면 @Assert 데코레이터가 필요하다.
class Person with _$Person {
('name.isNotEmpty', 'name cannot be empty')
('age >= 0')
factory Person({
String? name,
int? age,
}) = _Person;
}
Default
assert와 마찬가지로 Dart는 "팩토리 생성자 재접근(redirecting factory constructors)"을 통해 기본값을 지정하는 것을 허용하지 않는다. 따라서 속성에 대한 기본값을 지정하려면 다음과 같이 @Default 주석이 필요하다.
class Example with _$Example {
const factory Example([(42) int value]) = _Example;
}
참고: 직렬화/역직렬화를 사용하는 경우에는
@JsonKey(defaultValue: <something>)가 자동으로 추가된다.
데코레이터와 주석
Freezed는 각각의 매개변수와 생성자 정의를 데코레이팅/문서화하여 속성 및 클래스 수준 데코레이터/문서화를 지원한다.
아래의 예시를 보자
class Person with _$Person {
const factory Person({
String? name,
int? age,
Gender? gender,
}) = _Person;
}
위 코드를 문서화 하려면 다음과 같이 적용하자
class Person with _$Person {
const factory Person({
/// The name of the user.
///
/// Must not be null
String? name,
int? age,
Gender? gender,
}) = _Person;
}
gender 속성을 @deprecated로 표시하려면 아래와 같이 작성한다.
class Person with _$Person {
const factory Person({
String? name,
int? age,
Gender? gender,
}) = _Person;
}
위와 같이 작성하면 아래의 모든 경우에 반영된다.
-
생성자
Person(gender: Gender.something); // gender is deprecated -
생성자 생성
_Person(gender: Gender.something); // gender is deprecated -
속성
Person person;
print(person.gender); // gender is deprecated -
copyWith매개변수Person person;
person.copyWith(gender: Gender.something); // gender is deprecated
위와 유사하게, 생성된 클래스에 적용하려면 정의하는 팩토리 생성자를 데코레이트할 수 있다.
_Person을 더이상 사용하지 않으려면 아래와 같이 작성한다.
class Person with _$Person {
const factory Person({
String? name,
int? age,
Gender? gender,
}) = _Person;
}
Union 유형에 대한 개별 클래스의 Mixin 및 인터페이스
같은 클래스에 여러 유형이 있는 경우 해당 유형 중 하나가 인터페이스를 구현하거나 클래스를 믹스인하도록 설정할 수 있다. 각각 @Implements 또는 @With 데코레이터를 사용하여 적용할 수 있다. 아래의 예시에서는 GeographicArea로 City를 구현한다.
abstract class GeographicArea {
int get population;
String get name;
}
sealed class Example with _$Example {
const factory Example.person(String name, int age) = Person;
<GeographicArea>()
const factory Example.city(String name, int population) = City;
}
이는 클래스에 일반 유형 매개변수(예: AdministrativeArea<T>)가 있는 경우를 제외하고는 일반 클래스를 구현하거나 혼합할 때도 작동한다(예: AdministrativeArea<House>). 이 경우 고정하면 올바른 코드가 생성되지만 컴파일할 때 주석 선언에 로드 오류가 발생한다. 이를 방지하려면 다음과 같이 @Implements.fromString 및 @With.fromString 데코레이터를 사용해야 한다.
abstract class GeographicArea {}
abstract class House {}
abstract class Shop {}
abstract class AdministrativeArea<T> {}
sealed class Example<T> with _$Example<T> {
const factory Example.person(String name, int age) = Person<T>;
.fromString('AdministrativeArea<T>')
const factory Example.street(String name) = Street<T>;
<House>()
<Shop>()
<GeographicArea>()
.fromString('AdministrativeArea<T>')
const factory Example.city(String name, int population) = City<T>;
}
참고 1: 모든 추상 멤버를 구현하여 인터페이스 요구 사항을 준수하는지 확인해야 한다. 인터페이스에 멤버가 없거나 필드만 있는 경우 유니온 타입의 생성자에 추가하여 인터페이스 계약을 이행할 수 있다. 인터페이스가 클래스에서 구현하는 메서드 또는 getter를 정의하는 경우 모델에 getter 및 메서드 추가하기 지침을 참고해야 하는 점에 유의하자.
참고 2: freezed 클래스에는
@With/@Implements를 사용할 수 없다. Freezed 클래스는 확장할 수 없다.
FromJson / ToJson
Freezed 는 fromJson / toJson 을 기본적으로 생성해주지 않지만, json_serializable을 활용한다면 이를 적용할 수 있다.
아래의 코드를 보자.
import 'package:freezed_annotation/freezed_annotation.dart';
part 'model.freezed.dart';
sealed class Model with _$Model {
factory Model.first(String a) = First;
factory Model.second(int b, bool c) = Second;
}
위 코드에 fromJson / toJson 을 추가하려면 아래의 두 줄을 추가해줘야한다.
part추가:part 'model.g.dart'- 목표 클래스에 생성자 추가:
factory Model.fromJson(Map<String, dynamic> json) => _$ModelFromJson(json);
적용된 결과는 아래와 같다.
import 'package:freezed_annotation/freezed_annotation.dart';
part 'model.freezed.dart';
part 'model.g.dart';
sealed class Model with _$Model {
factory Model.first(String a) = First;
factory Model.second(int b, bool c) = Second;
factory Model.fromJson(Map<String, dynamic> json) => _$ModelFromJson(json);
}
pubspec.yaml에json_serializable을 추가하는 것을 잊지말자!
dev_dependencies:
  json_serializable:
- Freezed는 factory에
=>를 사용하는 경우에만 코드를 생성해준다.
fromJSON - 여러 생성자가 있는 경우
여러 생성자가 있는 클래스의 경우 Freezed는 런타임 유형이라는 문자열 요소에 대한 JSON 응답을 확인하고 그 값에 따라 사용할 생성자를 선택한다.
아래의 예시를 보자
sealed class MyResponse with _$MyResponse {
const factory MyResponse(String a) = MyResponseData;
const factory MyResponse.special(String a, int b) = MyResponseSpecial;
const factory MyResponse.error(String message) = MyResponseError;
factory MyResponse.fromJson(Map<String, dynamic> json) => _$MyResponseFromJson(json);
}
Freezed는 다음과 같이 각 JSON 객체의 런타임 유형을 사용하여 생성자를 선택한다.
[
  {
    "runtimeType": "default",
    "a": "This JSON object will use constructor MyResponse()"
  },
  {
    "runtimeType": "special",
    "a": "This JSON object will use constructor MyResponse.special()",
    "b": 42
  },
  {
    "runtimeType": "error",
    "message": "This JSON object will use constructor MyResponse.error()"
  }
]
@Freezed와 @FreezedUnionValue를 활용하면 key와 value를 다른 값으로 변경할 수도 있다.
(unionKey: 'type', unionValueCase: FreezedUnionCase.pascal)
sealed class MyResponse with _$MyResponse {
const factory MyResponse(String a) = MyResponseData;
('SpecialCase')
const factory MyResponse.special(String a, int b) = MyResponseSpecial;
const factory MyResponse.error(String message) = MyResponseError;
// ...
}
위와 같이 작성하면 JSON 데이터는 아래와 같이 변경된다.
[
  {
    "type": "Default",
    "a": "This JSON object will use constructor MyResponse()"
  },
  {
    "type": "SpecialCase",
    "a": "This JSON object will use constructor MyResponse.special()",
    "b": 42
  },
  {
    "type": "Error",
    "message": "This JSON object will use constructor MyResponse.error()"
  }
]
key와 value를 커스터마이징 하기위해서는 build.yaml 파일을 다음과 같이 변경해주어야한다.
targets:
  $default:
    builders:
      freezed:
        options:
          union_key: type
          union_value_case: pascal
JSON 응답을 제어하지 않는 경우 사용자 정의 변환기를 구현할 수 있다. 사용자 정의 변환기는 사용할 생성자를 결정하기 위한 자체 로직을 추가로 구현해야한다.
class MyResponseConverter implements JsonConverter<MyResponse, Map<String, dynamic>> {
const MyResponseConverter();
MyResponse fromJson(Map<String, dynamic> json) {
// type data was already set (e.g. because we serialized it ourselves)
if (json['runtimeType'] != null) {
return MyResponse.fromJson(json);
}
// you need to find some condition to know which type it is. e.g. check the presence of some field in the json
if (isTypeData) {
return MyResponseData.fromJson(json);
} else if (isTypeSpecial) {
return MyResponseSpecial.fromJson(json);
} else if (isTypeError) {
return MyResponseError.fromJson(json);
} else {
throw Exception('Could not determine the constructor for mapping from JSON');
}
}
Map<String, dynamic> toJson(MyResponse data) => data.toJson();
}
이를 적용하려면 데코레이터 생성자 매개변수에 아래와 같이 전달해야 한다.
class MyModel with _$MyModel {
const factory MyModel(() MyResponse myResponse) = MyModelData;
factory MyModel.fromJson(Map<String, dynamic> json) => _$MyModelFromJson(json);
}
이렇게 하면, json 직렬화/역직렬화에 MyResponseConverter.fromJson()과 MyResponseConverter.toJson()를 사용한다.
아래와 같이 생성자 매개변수에 List를 추가하도록 커스텀 변환기를 설정할 수 있다.
class MyModel with _$MyModel {
const factory MyModel(() List<MyResponse> myResponse) = MyModelData;
factory MyModel.fromJson(Map<String, dynamic> json) => _$MyModelFromJson(json);
}
freezed 객체의 중첩 리스트를 직렬화하려면
@JsonSerializable(explicitToJson: true)를 추가하거나,build.yaml파일에explicit_to_json을 추가한다.
일반 클래스의 역직렬화
/// 내용 추가
Generator 실행
Code generator를 실행하기 위해, 터미널(프로젝트 루트 위치)에 아래의 명령어를 입력한다.
dart run build_runner build